Building a keezer is not only a practical solution for proper beer storage and dispensing, but it’s also a fun and rewarding DIY project for homebrewers. In this comprehensive guide, I will walk you through the step-by-step process of building your own keezer that will leave your fellow beer enthusiasts green with envy. From selecting the right chest freezer to setting up the kegerator system and integrating temperature control, we will cover all the essential aspects of building a keezer.
So, grab your tools, put on your creative hat, and get ready to transform your ordinary chest freezer into a magnificent keezer that will showcase your brews in style. With insider tips and tricks, you’ll have a beer dispensing masterpiece in no time.
Key Takeaways:
- Building a keezer is a practical and rewarding DIY project for homebrewers.
- Selecting the right chest freezer is crucial for a successful keezer build.
- Proper planning and design considerations are essential for a functional and visually appealing keezer.
- The keezer collar plays a significant role in elevating the taps and faucet above the freezer’s lid.
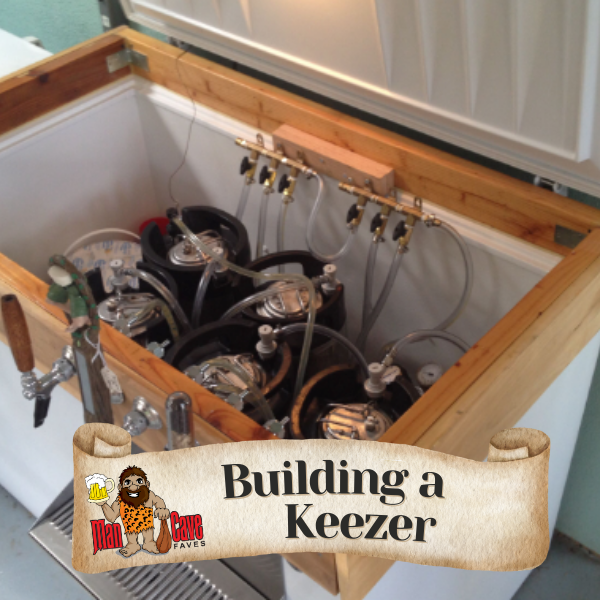
- Setting up the kegerator system involves installing beer lines, gas lines, and selecting the right faucets.
Getting Started with Your Keezer Build
When it comes to building your own keezer, there are a few key steps to get started. First and foremost, you’ll need to choose the right chest freezer for the job. This is an essential component that will house and cool your kegs, so it’s important to consider factors such as size, energy efficiency, and temperature control options. Selecting a chest freezer that meets your specific needs is crucial to the success of your keezer build.
Choosing the Right Chest Freezer for Your Keezer
When selecting a chest freezer for your keezer, there are a few important factors to keep in mind. Size is a crucial consideration, as it will determine how many kegs you can fit inside and how much beer you can have on tap. Additionally, energy efficiency is key to minimize energy costs and environmental impact.
Temperature control options are another important consideration. Some chest freezers come with built-in temperature control systems, while others may require you to install a separate temperature controller. Depending on your preferences and budget, you can choose a chest freezer that best suits your needs.
Keezer Design Basics: Planning Your DIY Project
Once you’ve chosen the right chest freezer, it’s time to start planning your DIY keezer project. This involves carefully designing and measuring your keezer to ensure a perfect fit for your space and brewing needs.
Consider the number of taps you want to have on your keezer, as well as any additional features you might want to incorporate. Some popular design elements include a drip tray, custom branding, or even LED lighting to give your keezer a unique and personalized touch. Planning your keezer design in advance will save you time and frustration during the construction process.
Now that you have a solid understanding of the initial steps involved in building a keezer, it’s time to move on to the next section: constructing the keezer collar. This essential component elevates the taps and faucet above the freezer’s lid, allowing for easy dispensing of your homebrewed beer.
Constructing the Keezer Collar
The keezer collar is a crucial component of your beer dispensing system that elevates the taps and faucet above the freezer’s lid. It not only provides a practical solution for attaching the faucet, but it also adds a touch of professionalism and style to your keezer build.
DIY Keezer Collar: Step-by-Step Guide
Constructing your own keezer collar can be a rewarding DIY project that allows you to customize the height and design to fit your specific needs. Here is a step-by-step guide to help you build your own keezer collar:
- Measure and cut the lumber: Start by measuring the circumference of your chest freezer lid. Use these measurements to cut the lumber to the appropriate length.
- Assemble the collar: Secure the pieces of lumber together using screws or nails to create a rectangular frame. Ensure the corners are square and the frame is sturdy.
- Add insulation: To prevent temperature loss, attach insulation material to the inside of the collar. This will help maintain a consistent temperature inside the keezer.
- Attach the collar to the lid: Using screws, attach the collar to the top of the chest freezer lid. Make sure the collar is centered and securely fastened.
- Seal the collar: Apply silicone sealant along the edges of the collar where it meets the lid. This will create a watertight seal and prevent any air leaks.
By following this step-by-step guide, you’ll have a sturdy and well-insulated keezer collar that enhances the functionality and appearance of your beer dispensing system.
Incorporating a Tap and Faucet into Your Keezer Collar
Once the keezer collar is constructed and securely attached to the lid, it’s time to incorporate a tap and faucet into the collar. Here’s how:
- Mark the location: Decide where you want to place the tap and faucet on the collar. Ensure there is enough space between the taps for easy pouring.
- Drill holes: Use a drill with the appropriate size hole saw bit to create holes for the faucet shanks. Be careful not to damage the collar or lid during the drilling process.
- Install the shanks: Insert the faucet shanks into the drilled holes and secure them with the necessary fittings and hardware. Make sure the shanks are tightly attached to prevent any leaks.
- Attach the faucet: Screw the faucets onto the shanks and tighten them securely. Ensure the faucets are positioned properly and align with the height of the collar.
- Add a drip tray: To catch any drips or spills, attach a drip tray beneath the faucets. This will help keep your keezer area clean and prevent any beer wastage.
With the tap and faucet installed, your keezer collar is now ready to dispense your favorite brews. Enjoy the convenience and satisfaction of pouring draft-quality beer right from the comfort of your home.
Setting Up the Kegerator System in Your Keezer
Now that you have built the foundation of your keezer, it’s time to bring it to life by setting up the kegerator system. This involves installing beer lines and gas lines to connect your kegs to the taps, ensuring smooth and effortless dispensing of your favorite brews.
Installing Beer Lines and Gas Lines in Your Keezer
Proper installation of beer lines and gas lines is essential for maintaining the quality and taste of your beer. Here’s a step-by-step guide to help you get it right:
- Start by measuring and cutting your beer lines and gas lines to the appropriate lengths. Ensure that the beer lines are long enough to reach from the bottom of the kegs to the faucets, while the gas lines should comfortably connect the CO2 tank to the kegs.
- Attach the ball lock connectors to the ends of the beer lines and gas lines. These connectors will securely fasten the lines to the kegs.
- Connect the beer lines to the liquid-out posts of the kegs and the gas lines to the gas-in posts. Ensure that the connections are tight and secure.
- Attach the other ends of the beer lines to the beer shanks inside the keezer. Use clamps to ensure a snug fit and prevent any unwanted leaks.
- Connect the gas line to the CO2 tank using a suitable gas manifold or regulator. Make sure to follow the manufacturer’s instructions for proper installation.
- Test for any leaks by pressurizing the system. Apply a soapy water solution to the connections and look for any bubbling, indicating a leak. Tighten the connections if necessary.
By following these steps, you’ll have a properly installed beer line and gas line system, ensuring your brews flow smoothly from keg to glass with every pour.
Selecting and Mounting the Right Faucets for Your Kegerator
When it comes to selecting and mounting faucets for your kegerator, there are a few important factors to consider:
- Faucet Design: Choose a faucet design that complements the overall aesthetics of your keezer. Options range from traditional tap handles to sleek and modern designs.
- Material: Look for faucets made from durable materials such as stainless steel or brass. These materials are resistant to corrosion and ensure long-lasting performance.
- Ease of Cleaning: Opt for faucets that are easy to disassemble and clean. This will help prevent any buildup of beer residue and maintain the freshness of your brews.
Once you have selected the right faucets, it’s time to mount them in your keezer. Here’s how:
- Drill appropriately sized holes in the keezer collar or freezer lid to accommodate the shanks of the faucets.
- Install the shanks into the holes and secure them using the provided mounting hardware.
- Connect the beer lines to the shanks, ensuring a tight and leak-free connection.
- Attach the faucet handles to the front of the keezer collar or freezer lid, completing the installation.
With the right faucets in place, you’ll have a professional-grade pouring experience every time you serve a refreshing pint from your keezer.
Integrating Temperature Control in Your Keezer
Temperature control is crucial for ensuring that your keezer maintains the perfect serving temperature for your beer. By integrating a reliable temperature controller, you can enjoy your brews at their optimal flavor and quality.
Choosing and Installing a Temperature Controller
When selecting a temperature controller for your keezer, consider factors such as accuracy, versatility, and ease of use. One popular option is the Inkbird temperature controller, known for its reliability and user-friendly interface.
To install the temperature controller, follow these steps:
- Choose a suitable location for the temperature controller near your keezer.
- Ensure that the temperature probe reaches the desired location inside the keezer.
- Connect the temperature controller to a power source and the keezer.
- Set the desired temperature on the controller to activate the temperature control function.
Once installed, the temperature controller will regulate the temperature inside your keezer, ensuring that your beer is always served at the perfect level of chill.
Tips for Maintaining Optimal Temperature in Your Keezer
In addition to using a temperature controller, there are other tips and techniques you can employ to maintain optimal temperature in your keezer:
- Insulate your keezer to prevent temperature fluctuations. Use insulation materials such as foam boards or weatherstripping to create a barrier between the freezer and the outside environment.
- Convert your freezer into a kegerator by sealing any gaps or openings with caulk or silicone sealant. This will help maintain a consistent temperature and prevent cold air from escaping.
- Use evabarrier tubing and duotight fittings to minimize heat transfer and maintain the desired temperature throughout the beer lines.
- Regularly check and calibrate the temperature probe to ensure accurate temperature readings.
By implementing these strategies, you can ensure that your keezer consistently delivers beer at the perfect temperature, enhancing the overall beer-drinking experience.
| Temperature Control Techniques | Benefits |
|---|---|
| Insulating the keezer | Prevents temperature fluctuations |
| Sealing gaps and openings | Maintains a consistent temperature |
| Using evabarrier tubing | Minimizes heat transfer in beer lines |
| Regular calibration of temperature probe | Ensures accurate temperature readings |
The Final Touches: Customizing Your DIY Keezer
Now that your DIY keezer is built, it’s time to add the final touches and make it uniquely yours. Personalizing your keezer not only adds character but also enhances the overall brewing experience. So, let’s dive into some fun ways to customize your keezer and make it stand out among the rest!
Personalizing Your Keezer: From Brew Branding to Aesthetic Additions
One of the most exciting aspects of building a DIY keezer is the opportunity to showcase your brewing skills and creativity. Consider adding your own brew branding to your keezer, whether it’s a custom logo, artwork, or even a witty beer label. This not only gives your keezer a professional touch but also makes it truly one-of-a-kind.
Don’t stop at brew branding; think about incorporating aesthetic additions that reflect your style and taste. LED lighting is a popular choice as it not only adds a mesmerizing glow but also creates a visual spectacle every time you open your keezer. From color-changing LEDs to subtle strip lighting, the possibilities are endless. Get creative and let your keezer shine!
Ensuring Durability and Functionality in Your Keezer Build
While customization is important, it’s equally crucial to ensure durability and functionality when building your keezer. Proper insulation is key to maintaining the ideal temperature for your beer and preventing energy wastage. Invest in high-quality insulation materials and take the time to seal any gaps or leaks.
Additionally, pay attention to the hardware used in your keezer build. Opt for sturdy components such as heavy-duty hinges, robust latches, and reliable temperature controllers. These small details can make a significant difference in the long run, saving you time, money, and potential headaches.
Lastly, don’t forget about easy maintenance. Incorporate features that make cleaning and upkeep a breeze, such as removable drip trays and accessible plumbing connections. This will ensure that your keezer remains in top-notch condition and continues to provide exceptional beer dispensing for years to come.
FAQ
What is a keezer?
A keezer is a custom-built beer dispensing system that combines a chest freezer with a draft system, allowing homebrewers to store and serve their own beer on tap.
Why should I build a keezer instead of buying a kegerator?
Building a keezer offers a more customizable and cost-effective option compared to buying a kegerator. You have the freedom to design and personalize your keezer according to your specific needs and preferences.
How do I choose the right chest freezer for my keezer?
When selecting a chest freezer for your keezer, consider factors such as size, energy efficiency, and availability of temperature control options. Take measurements and ensure the freezer has enough space to hold your desired number of kegs.
What materials do I need to construct a keezer collar?
To construct a keezer collar, you will need lumber, foam insulation, silicone sealant, and appropriate tools such as a drill and hole saw. The collar elevates the taps and faucet above the freezer’s lid and provides space for the draught system components.
How do I install beer lines and gas lines in my keezer?
Installing beer lines and gas lines in your keezer involves connecting the kegs to the taps. You will need appropriate tubing, clamps, and a gas manifold. Proper installation and maintenance of these lines are essential for optimal beer dispensing performance.
How do I set up temperature control in my keezer?
To set up temperature control in your keezer, you will need a temperature controller and a temperature probe. Choose a controller that allows you to set and monitor the temperature inside the keezer. Proper insulation and utilization of temperature probes are crucial for maintaining the desired serving temperature.
Can I customize my keezer?
Yes! You can personalize your keezer by adding your own brew branding, incorporating aesthetic additions like LED lighting, and ensuring durability and functionality by using proper insulation and sturdy hardware.